Saturday, October 31, 2009

VOT Dress - Fashion Shoot

It took way too long to hem this dress.  Several evenings this week after work, I thought that I would just sit down and do the hems:


But it never happened!  So this afternoon, I bite the bullet turned on my television, cued up CSI Miami on OnDemand and added the hem tape and stitched the hems down.

I also decided that I didn't need the covered button for the collar.  I have a really kewl pin collection and leaving the embellishment off would give me opportunities to showcase them:


Now in the case of full disclosure...I must admit that I am wearing a super duper heavy all-in-one bodyshaper.  Adding the embellished waistline to the dress brings attention to an area that is not my most attractive feature...*LOL*  But I really wanted to try something different and I think it works:


Dress Alone


Dress with the cardigan ~ and how I will most likely wear it!

An interior shot of the lining and armhole & neckline bindings:


I really like this dress.  It is a different take on my TNT dress with a little retro vibe.  And even though it was a little labor intensive, it was worth the effort!  All of the construction information is included in these posts.  

Since it's dress weather...in the low fifties here on the East Coast...I plan on making a few more but next up is a simple lined skirt...

...as always, more later!


Thursday, October 29, 2009

New Sewists Thursdays - Linings

I've received two questions on linings:

Tricia asks:
"I am always struck by how beautifully all your dresses are lined - with contrasting binding and looking so neat. This is something I struggle with. My first attempt at lining was with a particularly slithery fabric and it did not go well at all. So, I just wanted to suggest lining a garment as a future topic for your new sewist feature."

Michelle asked:
"In this week's NST I noticed you mention that you liked to line your garments. Once, I was reading a sewing blog (but the name eludes me at the moment) and she mentioned that she doesn't like to line garments because then she would have to dry-clean it...Do you have to dry-clean a lined garment?"


First can I recommend a fantastic book on linings called, "Easy Guide to Sewing Linings" by Connie Long.  This book is published by Taunton Press and is part of the Sewing Companion Library.  Copies can be found on Amazon.com and at www.alibris.com.  However, I can't believe that I paid $20 for this book in 1999 and now 10 years later the cheapest copy I can find is selling for about $45!!!  If you can find a copy of this book at a yard sale or a library sale or even if you can afford to pay the $45 for it, believe me it's worth it.

The best thing about this book is that it tells you how to line EVERYTHING!  Everything from a coat, jacket to a sweater...how to line around vents and how to make lining pattern pieces for patterns that don't come with a lining pattern.

ETA from MelissaL88:
If you search on the Threads site, you will find the book as a PDF download for $14. Then you can print it out yourself and put it in a binder.
**Thanks MelissaL88!!!**


The first few lines of the book by Connie Long state:
"I consider adding a lining the ultimate way to clean finish any garment I sew.  A lined garment does not cling, is more comfortable to wear, is easier to slide on and off, and looks just as good on the inside as it does on the outside.  Adding a lining to a dress or skirt eliminates the need to wear a slip.  Lining even the simpliest style improves the garment's finished effect and is an important ingredient in sewing clothing that rivals high-quality ready-to-wear."

And that in a nutshell sums up why I line garments.  As to the how-to, I find that dresses and skirts are the easiest to line and where I started my lining journey.  That's because I could use the actual pattern pieces to cut out the lining fabric to make the lining.  It is also where I would suggest that new sewists start.  You can realize success by lining a skirt and then move onto other garments confident that you can handle this new skill.

So you are probably asking how to do it right?  How about I share some online references on how to line that you can print out and use when making your next lined garment.

1.  Threads article on lining garments
2.  From sewing.org "Learn to sew - lining"

I feel like I'm not doing this subject justice - but each garment piece comes with its own unique set of challenges on how to line it.  How to insure that it hangs correctly in the garment and best enhances the garment.  That is why I think it's better to direct you to the teachers I had so that you get the proper skills in learning the task.

Fabrics to be used for lining:

As with all fabrics there are different types of lining fabrics...you can purchase a lining fabric from $1 to many tens of dollars.  Remember you get what you pay for it...less expensive can have more problems with sewing the pieces together, shrinkage, dye fastness, etc.  However, most sewists would recommend a rayon bemberg lining because it enhances the fashion fabric it is applied to...because it is cool in the summer and adds warmth to a garment in the winter...because it breathes...because it comes in an array of awesome colors and two widths...and mostly because it is a joy to work with. 

I have used other fabrics to line garments with also...things like china silk, silk charmeuse, some silky polyesters, some lightweight woven silks, and cotton batiste.  These options can be pricy or inexpensive it just depends on where you find them.  They also can add a luxuriousness to your garment.

As for the slippery factor...the fabrics that I choose for linings have the ability to ease garments on and off but I've never experienced the slipperiness of say a silk chiffon when cutting out.  But when I lay a lining fabric out, I do have my extra magnetic pincushions on the cutting table to lay at strategic spots so that the fabric doesn't slide off the table.  I've also been known to use a can or two of food for stability.  I also pin the patterns securely to the fabric before I cut them out...because I still use shears to cut out...not a rotary cutter!

To me, linings should always be pretreated before they are inserted into the garment.  As a newbie, I have skipped this step and lived to regret it.  My lining shrunk...my fashion fabric did not...my garment became unwearable...all that work gone because I skipped a step.  However, I am a lazy pretreater...almost all linings go in the washing machine on a gentle cycle with hot water...yes, even the silks.  I am even harder on them because I then throw them in the dryer for a few minutes taking them out while they are still damp and pressing them dry.  But using this method, I have never had a lining shrink once inserted in the garment.  I have had a few pieces shred or develop tears during the pretreatment process but instead of being upset, I've been glad to have that happen.  That showed me that the fabric I was using was inferior and would probably not withstand the rigors of daily wear.

The drycleaning question...ummmm...to me this is a personal decision.  I dryclean 99% of my lined winter garments and 75% of my lined summer garments.  I rarely wash garments that have lining and alot of interior work but that's me.  I know other sewists who have developed means and methods for washing lined garments because they don't like dry cleaning.  This is something that I truly believe you have to work out for yourself.

Okay here comes the encouragement part of the post! *smile*  You have to try lining a garment.  You just have to do it.  If it doesn't work...realize what didn't work and use it as a learning experience.  If it was the lining fabric...chose another one.  If there were problems inserting it...find out why it didn't work.  Ask your question on one of the internet sewing boards like Stitchers Guild or PR.  Use the online references above or purchase a good sewing book but don't give up.  The old saw that practice makes perfect is so true with all parts of sewing.  Mostly don't be discouraged...you will perfect the technique if you just.keep.trying.

I hope I answered most of your questions...again let me state that I'm not sure that I've given this question a fair shake especially if you are looking for instructions on how to line a garment.  But as with most of these new sewists blog posts the information is general with links to give you more detailed instructions.  Hopefully this will start you along the path and encourage you to continue the journey!  And as always if someone has something helpful to add to the conversation...please feel free to do so!

Pictures of the VOT Dress are up next - so stay tuned!!!

Monday, October 26, 2009

Presenting Vogue 1127 and the coordinating sheath dress

I came home tonight and sewed the button on the jacket:


and hemmed the dress...so here is a little fashion show:
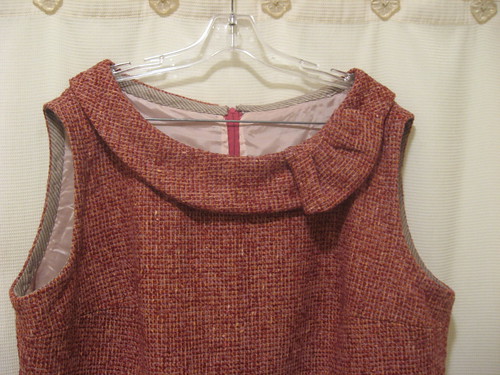

Dress with jacket


Dress alone


Jacket open so you can see all the hard work!


Some stats:

Fabric:
5 yards of Italian cotton from Emmaonesock

Notions:
4 yards of medium weight satin type lining from Metro Textiles
1 button
1 22" invisible zipper
yards and yards of bias binding
1/2 yard of interfacing

Construction:
This is a pretty easy jacket to sew.  I, of course, changed a few things.

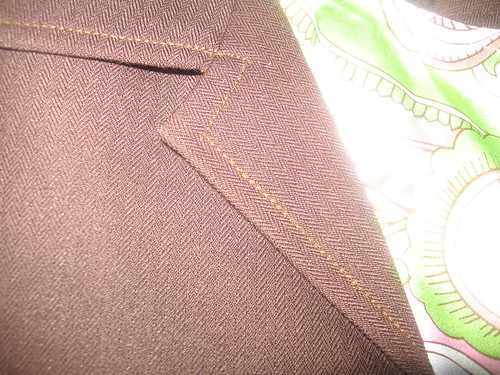
1.  The jacket has three buttons as the closure.  I tried this out and I just didn't like the way it looked on me.  Tooooo Star Trekish...and while I'm a fan of the show, I don't really want to wear that look to work!  So I used just one fabulous button and made the buttonhole on the diagonal to really showcase the button.

2.  The entire jacket is underlined with the gray satin lining instead of just adding lining to the sleeves like the pattern suggests.  Not only did the lining add weight to the jacket but it made it slide on and off so much easier.

3.  I added interfacing to both sides of the collar.  I thought that adding interfacing to only one side would make the collar really floppy...and even with my adding it to both sides the collar still flops a little.  I used a medium weight fusible interfacing.  I contemplated using a stiffer/heavier interfacing but I think the collar would have stood up like a military collar and that was not the look I was going for at all!

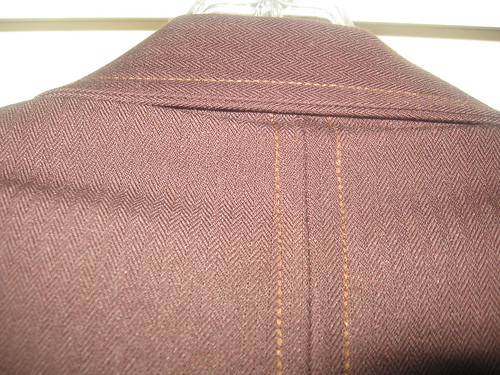
4.  In both reviews on PR, they mention that the darts in the shoulder make your shoulders look really wide and really square...again that Star Trek look!  I solved this problem by curving the darts at the end so they end more like dolman sleeve shoulders.  I think this is working for me and solved the problem.

5.  Because I underlined all of the pieces - the dart was exposed in the sleeve.  I simply tucked the ends under and machine stitched them down.

The most time consuming part of this jacket is binding EVERYTHING and I mean everything! *LOL*  My jacket does look a little different than the pattern envelope but it fits my lifestyle and my vision for my outfit.  But I will not be making this jacket again.  It is a little too distinctive.  So I will have to find another pattern to use for the maroon coordinates...however, I have finished my first outfit from my "Elegant Fall Collection!"

Just a quick note about the coordinating lined sheath dress...it is made from my TNT dress pattern.  It is lined with the same gray satin lining and not only will it work with this jacket but a couple of white cardigan sweaters from my closet also.  I think the dress adds the perfect touch to the jacket.  As a bonus there is a little over a yard of gray fabric left.  So it will become a straight skirt to go along with the jacket and dress.

As a parting shot...a certain little man just would not be quiet until he became a part of the fashion shoot too!!!
...as always, more later!


Sunday, October 25, 2009

Almost Done

It was a good sewing weekend...


I made both the jacket (V1127) and the matching dress (TNT pattern) from the gray cotton blend...although both need hand work to be completely finished and wearable.  The jacket just needs a button sewn on.  The dress needs to be hemmed.

The VOT dress still needs a hem and the covered button added to the collar.  I guess I could have finished the Vogue jacket and the VOT dress but when I realized it was just 4pm in the afternoon, I went for it and cut and sewed the matching lined dress.

I know I promised pictures of me in the VOT dress this weekend but faced with the choice to keep sewing or stop and take pictures...well I went with "just keep sewing!"  *LOL*

So as soon as I've finished up the hand sewing on both outfits, I will post "fashion shot" pictures and detailed construction information on the jacket.  It was an interesting piece to sew and a little different from my norm.

...as always more later!

Saturday, October 24, 2009

Vogue 1127 - Part 4 - The Bias Binding for the Jacket

Quite honestly even though the pattern had a piece for making bias binding strips, in my heart of hearts I just didn't want to use it.  At first I told myself that it would give the garment a more cohesive look...the bias binding matching either the fashion fabric or the underlining...but I wasn't really sold.

So the project sat...and I moved on.  I even checked a few trim stores in NYC for pre-made bias binding and no go there either!  BTW, why does M&J have such a small (and I mean small!) selection of pre-made bias binding?  And the colors of gray satin bias binding at Daytona and another little trim store that I looked at didn't work either.

Then last weekend when I was digging around in the drawer full of pre-cut bias rolls that I bought from Fabric Mart about 10 years ago (and one of the best buys I ever made from them!) to make some bias binding for the VOT Dress, I found this roll:


To say that I was a little excited would be an understatement! *LOL*  All week I've been waiting for the time to turn this roll into bias binding.  I even fell asleep yesterday evening on the bus home dreaming about how to apply the bias binding to not only the jacket but the accompanying dress.

I am soooo inspired that I got up this morning, put up the ironing board and commenced to making yards and yards of bias binding:


Here is a sneak peek of the finished bias binding on the cut out pieces of fabric:


I'm off to spend the rest of the afternoon working on the jacket...and no, I haven't forgotten about finishing up the VOT Dress.  I can do both this weekend.  Also, if I'm diligent, I may just get the dress that accompanies the jacket started too!

Did I mention that I'm so excited and inspired!  *LOL*  I'm off to sew and as always...more later!

Thursday, October 22, 2009

New Sewists Thursdays - Fabrics

Sewing Mama asked, "How do you choose fabric for your projects?"

Oh boy is this a loaded question! *LOL*  Because I believe one of the hardest things for beginning sewists to understand is that each piece of fabric has a distinctive personality.  It has certain traits because of the way it was woven or knit, the weight of it, if it was yarn dyed or dip dyed and if a finishing was added to it ~ all of these things can affect the way the fabric handles.

So let's start at the beginning...when I first started sewing I did not use the fabrics that I sew with today.  There was definitely a progression.  As my skills progressed and as my paycheck increased (*smile*), I had the opportunity and the ability to deal with better quality fabrics.  I also had experience.  I knew what worked for me and my lifestyle.

The first thing I would suggest is to work with as many types of fabric as possible and RECORD your adventures with them.  Say you made a dress out of a polyester blend...and you found that it worked for the dress you chose and you were happy with the end result.  Write down what made it easy to work with...did it take a machine stitch easily?  Did it press well?  Did it work well with the style of garment you chose?  etc. 

You will begin to build your own database of fabrics and styles that you like and you will have a reference to refer to for future garments. 


Also always use the pattern envelope's suggestions for fabric types...that information is placed there for a reason.  The designer/patternmaker had a good idea of what type of look they were going for and the fabric suggestions are aimed at helping you achieve that look.  When I first learned to sew, I rarely chose a fabric outside of this guideline.  It was my bible for fabric selection.

Now there is always a piece that will defy explanation when you make it up.  It will be the right fabric for the garment type and still something will be off.  First you should know that it happens to everyone.  When I worked in a showroom in the garment district ~ the patternmakers would have the sample makers make garments in several different fabrications.  The garment that made it into the line was the one that worked well in the fabric.  Sometimes we as home sewists have to make a garment from several fabrications to get the one that works best too. 

But SewingMama is asking me personally, and I have to admit that I don't have a secret formula.  I could tell you to take this pattern, add this fabric, sew carefully and you will get a beautiful well fitted garment but it doesn't always work that way...let us not forget "The Cheerleading Dress"!  *LOL*  But I do know what fabrics I'm comfortable wearing, as well as what I like to sew.  I've learned that even though I like corduroy pants for warmth, I can't stand the sound of them when I walk in them.  I've learned that as much as I like moleskin ~ its too hot to wear in the late summer and yet very cold in the late fall when the temperatures start to drop...but it tailors beautifully!  I've learned that I like working with wool crepe and 100% wools but I don't really like working with gabardine that much...it won't hold a press...and I absolutely abhor working with chiffon...especially polyester chiffon!

I've also learned what styles work best for my body...okay that's another whole post but since I know what works for me and what fabric types I like to work with...that's how I make my choices.  But again can I stress that these choices are based upon my own sewing experiences...and once again I'm encouraging you to just keep sewing.  Keep trying.  Keep learning and keep making mistakes...cause even after 39 years of sewing, I still make them and learn from them!

I don't know why this came to me but it is so appropo for this post...there is a scripture in the Bible that goes...line upon line and precept upon precept...is the way things are built.  Okay that was definitely paraphrased but sewing is the same way.  It is concept upon concept...triumph upon triumph and even failure upon failure that builds a knowledgeable, well-accomplished sewist.

And as an update...
I will be sewing this weekend...and I will take pictures and share...as always...more later!

Tuesday, October 20, 2009

The Collar on the VOT Dress

I had a question in my email asking about the collar's construction...so here goes...

As you know this dress was suppose to be a simple sheath dress.  I liked the fabric, I thought it would make a great layering piece...dress/cardigan combination...but somewhere between the thinking and the cutting out something else occurred.

I've been seeing a lot of those retro collars and I thought this would be the perfect time to add one to the dress.  I thought it would play off well against the embellished band.  So I went looking for a collar pattern and since so many of my vintage patterns have collars, I started with one of them.  This one to be exact:


Simplicity 6985

I measured the pattern against my neckline and it was way too short.  So I added some to the pattern piece to get this:


Then I cut 4 pieces from the fashion fabric.  Sewed 2 together without adding interfacing.  I didn't want a stiff collar ~ so no interfacing.  Then I played with the collars by pinning them down starting at the center back of the dress.  I was trying to get an offset affect.  I finally achieved that by pinning one collar flat and then pinning the other on top.  Flipping a piece of the collar back onto itself and gathering it up.  All of this was then basted down.

The original vintage pattern had facing pieces.  I did not want facing pieces in a dress with a lining.  So I went digging through the bias tape drawer and pulled out the brown/tan striped bias binding.  It was applied to the top of the collar with a 1/2" seam allowance.  Then I trimmed the seam down and wrapped the bias binding under the seam.  All of this was pressed into place.  Press a section of the collar, use a lot of steam and a clapper...let it set...and then move to the next section of the collar.

After the pressing, it was pinned in place and the binding was handstitched down.  It made a much nicer and cleaner finish for the neckline, imho, than the facing pieces from the pattern.  The final step to give the collar a little va-va-voom will be the large covered button made from a piece of the embellished band.


Finally, there was another question about how I buy patterns.  If I purchase them just for the details? 

Definitely!  *LOL*  I purchase them for details, for inspiration, for the instructions (especially the vintage ones!).  And quite a few of them I purchase believing that some day I will make a garment from them!  I guess that would be true if I stopped fiddling around with my TNT patterns!

I get home so late in the evening that I won't be working on this dress again until the weekend.  So pics of me in the dress this weekend after all of the finishing details are completed...I promise!

...as always, more later!

Monday, October 19, 2009

VOT Dress - Almost Finished

For someone who was sewing easy-breezy separates during this 3-day weekend...well that just didn't happen!

I did continue to work on the VOT (Variation on a Theme dress) and I wanted to give you an update on the progress of the dress.  Here it is so far:


I still need to:
*add lace to the lining hem and finish it.
*add rayon seam binding to the hem of the dress
*hem the dress
*make a covered button from the trim and add to the collar of the dress

I will not be wearing this dress to work tomorrow.  However, I did sleep alot.  I watched a few movies...loved "The Proposal" btw!  And will finish this up next weekend.

A Parting Shot ~ a close-up of the collar...


Construction details will follow when I've finished the dress!  And as always...more later!

Sunday, October 18, 2009

Variation on a theme

I've decided that I only make one thing...dresses...and I typically make a dress using my TNT pattern.  Even though I'm beginning to think that Summerset is correct when she calls my TNT pattern a sloper because I'm forever making it do tricks.

So this weekend's trick is a variation on a theme.  It is similar to my "Dreaming of Spring Dress."  In that it has that middle waistband piece.  This version, however, has the bodice lengthened by 2 inches.  I'm a little tired of the empire waist look and wanted a band that hit more at my "natural" waistline.

There are presently quite a few dresses being shown in RTW with this waist interest. 


Close-up of Banana Republic Dress


Banana Republic Dress


Coldwater Creek Brocade Dress

There is even a new Simplicity pattern that has this very waistline detail - although it doesn't come in true plus sizes...which *sigh* I just don't get.  I mean if I can alter a pattern to fit me using this design, why can't true patternmakers! *sigh*


I've spent the afternoon working on my latest dress from this boucle fabric:


...which I purchased from Fabric Mart at least 5 or 6 years ago.  Wendy took a piece of this home with her to make a skirt, leaving the rest for me and bringing it back to my attention.

Here is a pic of the band being made.  I knew that I wanted it to be embellished so after digging around in the trim drawer, I found two pieces that I thought would work.


Finally a pic of the embellished band attached to the bodice:


I stopped for a dinner break and decided to post an update before heading back to my sewing area to finish constructing the dress.

More later...

Saturday, October 17, 2009

Sewing, Rain, Weekend

So we all realize that it's Saturday morning...so that covers the Weekend portion of the title...

And it is raining to beat the band here in NJ...huge, big drops that you have no trouble seeing right outside my kitchen window...

Finally, I will be sewing today. But I'm in a mood you see...I don't know if its the weather...or if its a reflection of what I've worn to work for the last three weeks...*sigh* But I just don't feel like working on Vogue 1127.  Not because I don't want to make it...I do!  I just don't feel like a very large involved project right now...so I'm putting it aside for another weekend.

I'm in the mood to sew separates.  One piecers that will go with garments that are already in my wardrobe.  I'm also in the mood to sew dresses.  Like when am I not in the mood to sew dresses, right?!  *LOL*  But seriously, I noticed that during this last set of meetings I was much more comfortable in a dress/jacket or dress/sweater combination than I was in a jacket/skirt combination.  I'm not sure if it was because there were so many moving pieces on my body or what?  I just know that I felt more professional and polished with a dress on.

Now that being said...the things I want to make are a couple of lined sheath dresses...a lined straight skirt and a cardigan.  Of course what I want to sew is greater than the time I have but isn't that always the case?  I've already cleaned my sewing table off...it didn't have as much "stuff" on it as usual.  Could that have something to do with the fact that I had visitors last weekend and so I actually had to clean my space? *LOL*

Anyway...I'm headed there shortly.  I have a few more internet spots to check...a little more inspiration to get and then I'm going to sew.  As always...more later!

Tuesday, October 13, 2009

Where I've Been...

I know I've been MIA but I am in the last week of three weeks of all day long, mind-numbing, and totally exhausting meetings.  I have two more this week and I'm free!  During this time I haven't really been thinking of much else...and then add to that the cold from h*ll and well you will understand why there hasn't been much here...

I also haven't sewn a stitch since I made the alterations to and cut out Vogue 1127.  I have a three day weekend this weekend and I plan on immersing myself in my sewing area.  I need some new clothes!  *LOL*

Anyway...I bought three new patterns from the last Club BMV sale:


Vogue 8626


Vogue 8623


Vogue 8610


I also want to thank Christy for enabling me during the last fabric.com sale.  It was a pretty good one with alot of the Ralph and Vera on sale for 40 to 70% off.  I was waffling and then Christy found me an additional 30% off coupon and I ended up with 14 yards for $37 with free shipping!  So I wanted to give her a shout out and say thanks!  The fabrics arrived last night and they are great!


And continuing in the trade off tradition, I think I gave away a couple of yards to the wonderful ladies Sunday so there is a little more space in the closet for the new pieces.  The silk twill and the tropical wool arrived from Fabric Mart...ohmygod!  These are AWESOME pieces and they have already been added to my must sew list!


That about brings me up to date...there will be no New Sewists Thursdays post this week either...it's just too much with the meetings to pull one together but it will be back next week!  So until the weekend and some actual sewing!

Sunday, October 11, 2009

Dinner with Friends!

This afternoon a wonderful group of women journeyed out to the burbs to have dinner with me!


Cidell


Lindsey T.


Karen and Elizabeth


Wendy


The only person I missed getting a picture of was Barbara (Cat Fur Studio)...how did I miss you? 

Cindy sitting and playing on my computer after everyone else left!


Ladies, thank you so much for coming by!!!  I had sooooo much fun!!!!

Monday, October 05, 2009

Who Would You Cast

...to play you in a movie?  Ann asked this a couple of days ago in a post...

And I knew right away who I would pick!  It wasn't even a thought and my daughter concurred.  She is sassy, funny, sexy, sure of herself and an audacious plus size woman who just might get nominated for an Academy Award later this year!


That's right...none other than Mo'nique herself!  Yeap, she could play me any day in a movie!  I would be soooooo thrilled!

Sunday, October 04, 2009

The Day Before

...okay I have risen up from bed...from where I've been laying since yesterday afternoon!  I was trying to make it through without giving in to the cold I knew was bearing down upon me but yesterday I gave up the fight.  I decided to take this 48 hours, sleep, hydrate and watch TV because I HAVE to go to work this week...important meetings...and my germs must be shared!  *LOL*

Anyway, with the remote in hand, I was surfing channels looking for something to watch...and being really bored...I had taken to reading the descriptions of the television programs and adding "reminders" so that I wouldn't forget anything.  I don't know if anyone else's cable company allows them to do this but I can set digital reminders and the cable box will "remind me" 2 minutes before the program starts.

So "The Day Before" is a program about the 48 hours preceding the Proenza Schouler Fall 2009 Fashion Show.  I just watched it and it was very interesting.  I can't tell if the last minute stuff annoyed me because I am not feeling well or if it annoyed me because I am a plan and get it done well ahead of time person.  However, it was an interesting behind the scenes look at these two young designers and how their Fall 2009 line came together.

If you get The Sundance Channel, the series airs again tomorrow evening at 7 pm EST featuring Karl Lagerfeld.  Sorry but you've missed the Proenza Schouler one...however,  I would check to see what time its showing if you are in another time zone because I don't know if The Sundance Channel adjusts like the major networks do.  Here is a link to the schedule showing more of these behind the scenes shows...

Finally one more link to the Fall 2009 Proenza Schouler Fashion Show from Style.com.  As I said previously, very interesting and well worth the 60 minutes to see it. 

I'm headed back to bed now and more episodes of CSI Miami...and I know drink alot and rest...

Saturday, October 03, 2009

A Trade

I'm really determined not to add a lot more to the fabric closet.  So even though it's brimming with luscious possibilities, every once and awhile I find something that either fits my lifestyle or piques my creative interest.  It also doesn't help if the internet site is running a 20% off sale!  *LOL*

Since the last silk twill I got from Fabric Mart was so wonderful and I'm having a love affair with orange right now...I bought three yards of this:


I also bought four yards of this navy/camel pinstripe tropical wool for work:


I've found that I'm lacking in navy fabric and want to beef this portion of the closet up a little more.  Who doesn't need good navy pieces when working in the financial industry?!

Now I've put both of these pieces in the cart at Fabric Mart and then closed it out several times.  Too much fabric, not enough time, running out of storage space...all of those things ran through my mind every time I closed the site, fabric unbought.  But today, my daughter was looking over my shoulder and she said, why don't you give me 7 yards from the closet and then you won't feel so bad about buying those pieces.

...and a trade was made!  My daughter is now anxiously awaiting an opportunity to go through the closet and pick out 7 yards of fabric to add to her burgeoning stash.  Although since she is home every day with the baby she has been making a few more things than I have.  I think she has her eyes on a piece of denim and a sweater knit which I will probably let her have.  And I no longer have to worry about how to fit 7 more yards in the closet...because they are replacement pieces...because a trade was made!  *LOL*

The 20% off sale on Fabric Mart's site is on until October 7th...Sample cut fabrics and mailers are exempt.  Just in case you were interested!  *LOL*

A parting shot of "The Little Prince" who is now 6 months old!


I'm off to sew!

Friday, October 02, 2009

September ~ End of the Month Recap

September was a fantastic sewing month for me but that's because I had a week off and instead of finding some wonderfully exotic place to jet off to and spend time beside the pool...I decided to stay at home and spend some quality time with my sewing machine! *LOL*

And I have to admit that I was wonderfully centered and ready to face the world again after 9 days at home with my machine.  I issued myself a small challenge ~ to sew one garment a day during the time I was home.  I ended up with 8 finished garments and even though I didn't make 10 ~ I was thrilled with what I ended up with!


Of course after such  a wonderous display of sewing fortitude...I didn't finish another thing all month! *LOL*  But I did get some fabric moved around...and I got a few dozen yards out of the fabric closet...all told 17.5 yards were sewn and 40 yards moved out...not that it makes much of a difference!  *LOL*  And in all of this sewing, moving and giving away...I only put 14 yards back into the collection.

I am sure that October will bring new adventures...new clothes and hopefully more wonderful fabrics pulled from the Fabric Closet to begin my sewing journeys with!

...as always more later!

Thursday, October 01, 2009

New Sewists Thursdays - Topstitching

It's Thursday so let's get straight to it..

Cissie asks:
"As an experienced sewist, but new to sewing for myself, I need to take "Topstitching 101". Any tips on how to get a more professional look with topstitching? Threads, needles, feet, etc?"

I like to topstitch.  It gives me an opportunity to highlight a part of my garment as well as use some of my decorative stitches.  It is also a wonderful but easy embellishment that can be added to a garment.

But for the very beginner's let's first define topstitching:

"As a decorative finish, on the outside, topstitching is similar in function to edgestitching only more noticeable" is how The Vogue/Butterick Step-by-Step Guide to Sewing Techniques defines it.  Then they give some instructions on how to do it: 
"Straight stitch 1/4" (6mm) from edge, seam or previous stitching.  Use presser foot as guide, or stitch where indicated in instructions."

The Dressmakers Technique Bible defines it as:
"Topstitching refers to visible stitches on the outside of a garment which can be functional but are normally just decorative.  Topstitching on the very edge is called "edge stitching" whereas "topstitching" is sewn approximately 1/4" (6mm) inside and parallel to the edge."

The how to instructions are more detailed:
1.  Choose suitable thread.
2.  Lengthen the straight stitch to approximately 8-10 stitches per inch.
3.  Stitch as necessary keeping the work straight to avoid "wiggles" - love this!  :)

A couple of tips:
*Use this on lapels and edges of a jacket and on pockets
*Use the edge of othe standard presser foot as a visual guide or attach a stitch guide foot to the machine to help keep the stitching straight.

As an aside...this is a really helpful little book and I would encourage you to add it to your sewing library!  But back to the matter at hand!

There are topstitching needles available.  They have larger eyes (openings) and the ability to hold two or more heavier pieces of thead at one time.  Do I have some in my collection, yes!  Do I remember to use them, no!  *LOL*

Second - topstitching thread.  This can be purchased probably at the craft store masquarading as a fabric store.  Topstitching Thread is a stronger, thicker thead that gives a bolder finish.  Again have I used it...yes!  Have I used it lately...ummmm, no!

Personally I believe the key to good topstitching is to maintain a straight line throughout the area of the garment being topstitched.  It really looks amateurish if you have "wiggles" (I'm so loving that word).  Now The Dressmaker's Technique Bible gives you several recommendations for obtaining a straight stitch.  But me, I use regular old scotch tape.  Yeap, that's it.  I'm usually topstitching a finished seam and when I do that I lay the scotch tape evenly down the center of the seam and use that as a guide. 

Now this next point is really important when using the scotch tape method...YOU MUST STITCH BOTH SIDES OF THE SEAM IN ONLY ONE DIRECTION!  If by chance you stitch top to bottom of the garment for one seam, then flip the garment and stitch bottom to top...you will get a wrinkling effect that no amount of pressing will remove.  On this I speak from experience!  So always stitch from top to bottom or from bottom to top on both sides of the seam.


An example of topstitching on the back center seam of a jacket
as well as edgestitching on the collar.

I also have been known to topstitch an edge or a lapel of a jacket.  When topstitching in those areas I always use the edge of my sewing machine foot as a guide...although if you have an edge stitch foot with your machine that would be great to use also.


topstitching on a jacket lapel

I love the line from the book that talks about topstitching thread having a bolder finish...and this is true!  However, since I am such a color stickler, you can't always match the topstitching thread with the regular thread you are using.  In those cases, I started using the decorative stitches on my sewing machine...starting with a triple knit stitch and graduating to a saddle stitch.  I don't know if these are standard on any other machine besides my Janome but it gives me that bolder finish I'm looking for!  Now I pretty much use one of those stitches and my regular Gutterman thread to topstitch...I know constantly making those rules fit my own world view!

But seriously, sometimes you can get some of the best results by taking a chance...being a little adventurous and doing something a little differently.

So to sum up:

1.  Topstitching is used to emphasis an area in your garment.
2.  It HAS to be sewn straight.
3.  You can use topstitching needles to perform this task but you don't necessarily need to!
4.  Topstitching thread is available to get a "bolder finish"
5.  Use your sewing machine foot to aid you with straight sewing...or your edge stitching foot.
6.  Don't forget to try my scotch tape method
7.  A decorative stitch can give you that bolder finish you want when topstitching an area.

Any questions, comments, suggestions...the floor is now open!

...and as an aside...I didn't get much finished on the jacket!  But it's suppose to rain all day on Saturday here on the East Coast and I'm in the frame of mind to shut myself in and sew!  I will keep you updated!!!

LinkWithin

Related Posts with Thumbnails